Viser opslag med etiketten MAC. Vis alle opslag

onsdag den 14. oktober 2015

Add blank space to an image in Mac Preview?

A hack on how to add empty/blank space to an image using Preview on Mac:
  1. Get the size in pixels of what you want the canvas to be
  2. Generate an image of that size here: https://placehold.it/{W}x{H} (e.g.https://placehold.it/350x1136)
  3. Copy the image (Control click, copy image)
  4. Open preview, press ⌘ command + N or File > New From Clipboard
  5. In the new image, select all (⌘ command + A) then hit delete
  6. Copy your original image(s) into your new canvas, reposition as needed
It's a hack, but it works. If you need anything more precise, then you'll probably need a proper photo editor.

This hack is found thanks to this source:
http://apple.stackexchange.com/questions/134713/can-you-add-blank-space-to-a-photo-in-mac-preview 

torsdag den 12. juni 2014

Cannot Delete Files in Trash on Mac!


Sometimes if the files are locked you cannot empty the trash can. Some files will simply not be deleted.
To solve this you can simply do this:

Hold down option/alt key and click Empty on the Finder menu


søndag den 16. marts 2014

Setup IMAP for Hotmail, Live Mail, and Outlook on Mac OS Mail

Microsoft has added IMAP support to it's different e-mail hosts (Outlook.com, Live, Hotmail etc.), which allows you to keep your e-mail synchronized when using third-party clients.
This is the same functionality as Google's Gmail which have been supporting IMAP for some years.
This tutorial will show you how to set your Microsoft Mail up and running with IMAP on Mac's Mail client.

Setup Microsoft mail on Mac's Mail


Step 1: Open Mail and add account
Click on Mail menu and select Add Account... 


Step 2: Choose Mail Account
Select Add Other Mail Account... and click Continue


Step 3: Enter your information
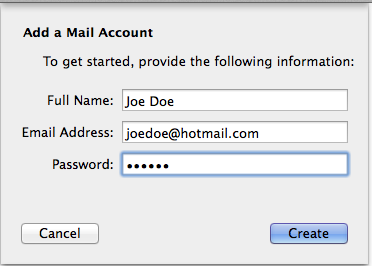
Write your full name, email address and password and click Create

After you click Create it contacts the server and tell you that you should configure account manually.
Then just click Next


Step 4: IMAP for incoming server
Choose IMAP and enter IMAP information for incoming server: imap-mail.outlook.com 
Click Next


Click Next


Step 5: IMAP for outgoing server
Enter this information SMTP Server: smtp-mail.outlook.com


Then click Create and you're done! 

torsdag den 8. august 2013

Screenshot in BootCamp on Windows 7/8 (Macbook Pro)

This article/tutorial tells how to take screenshot with hotkeys on Boot Camp for windows 7 or 8.
Here is one of the shortcuts: Function(fn) + Shift + F11

Read More Here:
http://www.mactrast.com/2011/12/how-to-boot-camp-taking-screenshots-in-window-7-with-a-apple-keyboard/

søndag den 4. august 2013

Disable Automatic Brightness on Windows 8 Bootcamp

Here is a link that explains very well how to disable automatic/adaptive brightness on your Windows 8 running with BootCamp on Mac.

I had a problem with my display brightness that most of the time was dark even though the brightness was adjustet to the maximum. This article solved my problem:
http://www.howtogeek.com/107173/disable-windows-8s-adaptive-brightness-to-fix-dark-screen-problems/

søndag den 19. maj 2013

Tortoise SVN for Mac

This is a tutorial on how to install a Tortoise SVN client like application on mac.

NB: this application is from 2010 and is made for Mac OS Snow Leopard. Although it works perfectly fine on my machine running Mac OS Mountain Lion 10.8.3. I cannot guarantee that it will work on your version of mac nor that it will be bugfree. In my case I think it is the best free (and maybe the only) solution for running a fully working svn client integrated with finder. This client is a plugin called SCPlugin.

Install SCPlugin

For installing SCPlugin the first thing you have to do is to download the installation file: SCPlugin
When you have downloaded the file  - you just run the installation as you normally do - with normal mac os installations. You just have to run all the default setups - click Next without changing any settings.

When finish installing the plugin - open the Application folder and find SCToolbarButton:

Move SCToolbarButton up to the finder bar and now your are ready to go...

Using SCPlugin

SCPlugin is very simple to use - you just have to follow these steps:
  1. Create an empty folder - For example i created a folder called SVN_Folder on  the desktop:
  2. Open the folder
  3. Click on the SCPlugin icon and choose Checkout
  4. A new window opens and you just fill in the blanks with your SVN Repository URL, Usename and Password - Notice the screendump below - you have to check the Recursive checkbox.
  5. When you have filled the blanks, just click the Checkout  button and you are done ! 

Links


onsdag den 15. maj 2013

Connecting Two Virtual Machines using virtual serial ports on VMWare for Mac


My Mac Sepcifications

MacBook Pro15'', late 2011
Processor  2,2 GHz Intel Core i7
Memory  8 GB 1333 MHz DDR3
Graphics  AMD Radeon HD 6750M 512 MB
Software  OS X 10.8.2 (12C60) - Mountain Lion

Installed Software

  • VMware Fusion Professional Version 5.0.3
    • Ubuntu 1 image installed on the virtual machine
    • Ubuntu 2 image installed on the virtual machine
So I have two ubuntu's running on my VMware.

Connect using virtual serial ports

For connecting the machines with serial ports on a mac - you have to do following steps:
Server
  1. You have installed both VMware images
  2. Find folder for the first image (Ubuntu 1)
  3. Right click on the .vmx file and open with TextEdit
  4. Replace Serial0 text with following:
    serial0.present = "TRUE"
    serial0.fileType = "pipe"
    serial0.yieldOnMsrRead = "TRUE"
    serial0.startConnected = "TRUE"
    serial0.fileName = "/Users/khaledsaied/Documents/Serial/empty"
  5.  serial0.fileName has to be a directory on your mac where you put an empty ASCII file
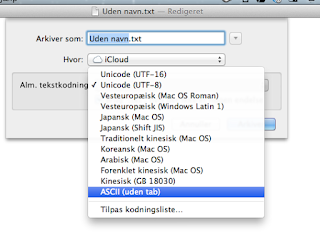
    1. The ASCII can be created with TextEdit  - see screenshots below:
Open TextEdit


Convert to regular text

Save
Choose ASCII Encoding (if ASCII is not in your list then choose change coding list)

Give the empty file a name without endings (.txt) for example: empty

Client
For the Client just repeat the above steps on the other image (Ubuntu 2), the only difference is that you in step 4 add following statement serial0.pipe.endPoint = "client" as follow:

serial0.present = "TRUE"
serial0.fileType = "pipe"
serial0.pipe.endPoint = "client"
serial0.yieldOnMsrRead = "TRUE"
serial0.startConnected = "TRUE"
serial0.fileName ="/Users/khaledsaied/Documents/Serial/empty"

THATS IT!!! That is all you have to do for getting a virtual serial port working between two virtual machines on Mac.

Serial Communcation with Terminal

The only thing you have to do now is to turn on both of your machines (Ubuntu 1 and Ubuntu 2), open Terminal on Ubuntu 1 and write following:
cat /dev/ttyS0
Then open Terminal on Ubuntu 2 and write following:
echo some random text > /dev/ttyS0
Now you should see the text "some random text" on the Ubuntu 1 Terminal.
*It is ttyS0 because I have used serial0.

NB: while changing in the .vmx file the virtual machines have to be turned off!
The directory with the empty ASCII file has to be the full legal path!


Links:

fredag den 1. februar 2013

Bootcamp Windows Partition Problem

My Mac Sepcifications

MacBook Pro15'', late 2011
Processor  2,2 GHz Intel Core i7
Memory  8 GB 1333 MHz DDR3
Graphics  AMD Radeon HD 6750M 512 MB
Software  OS X 10.8.2 (12C60) - Mountain Lion


OBS!!! THE SOLUTION TO MY PROBLEM

Because none of the solutions that I have tried(described later in this post) worked for me I ended up recovering the whole Mac OS but even that didn't solve the problem.

Then I saw this post which may solve my problem:
The problem is that you have to use a certain DVD-drive - Apple USB SuperDrive - to install/boot Windows and since my MacBook Pro's internal DVD-drive does not work I have used an external DVD-drive which is much likely causing the problem. Therefore the only solution (in my case) is to use the Apple USB SuperDrive or with other words replace my internal drive with a new working internal drive from Apple.
After replacing my internal drive (through my insurance company) my problem was solved.

This solution does only count for MacBook Pro from 2011 and after. If you have a MacBook Pro from 2010 or earlier this would probably not be the cause to your problem.

See also: Solution - forum.notebookreview.com


My Procedure for installing a Windows BootCamp

I have used Boot Camp-assistant for making the windows Partition. For installing windows I have downloaded the 64-bit Windows 8 installation(.iso) from dreamspark.com
My procedure for the installation of windows partition is following:
Launch Boot Camp-assistant:
  1. Create a Windows 8 install-disk - Created using an 8GB Kingston DataTraveler Flashdrive
  2. Get the newest software for Windows-support from Apple - Stored on a 16GB SanDisk Flashdrive
  3. Install Windows 8 - Made an 100GB partition for Windows with Boot Camp-assistant
  4. When the partition was done it restartet the Mac
    After having succesfully done the 4 steps above and while the Mac restarting I held-down the option key(alt-key) :
  5. The USB install-disk became visible and I clicked on it (EFI Boot).  

Now the Windows install screen pops up
  1. I chose language and clicked the Next button:
  2. I clicked the Install now button:

  3. Then I typed the product key:
  4. I accepted the license terms and clicked the Next button:
  5. I chose Custom installation type:
  6. Until now everything was OK - but now I have to choose on which partition I want to install Windows. I chose Drive 0 Partition 3: BOOTCAMP:

    And I got this warning Windows can't be installed on drive 0 partition 3. (Show details)

    Clicked (Show details) for details and got this error message:

  7. I then thought it was because I had to format the partition to NTFS format so I tried that:
  8. After formatting the partition to NTFS i still get the same warning/error:

    I also tried this solution without luck: Alternative way to NTFS format the partition
OBS!: The solution is described in the beginning of this post !

Windows Partition Problem

In case you did not catch the problem. The problem is that I cannot install Windows on the partition I made through Boot Camp-assistant on my MacBook Pro.

I have also gotten 2 other errors
1. ERROR
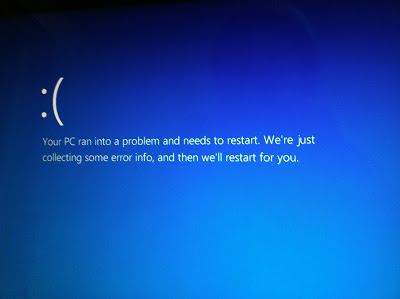
Sometimes i get through the first steps of the installation like in My Procedure for installing a Windows BootCamp. But other times the installation crashes right after I chose the USB-install disk where this error pops up and the Mac immediately reboots:


2. ERROR
I always get this error if I don't hold down the option-key while rebooting for installing Windows.

Tutorials

Here are the tutorials I have used:

SOLUTIONS to the partition problem that I have tried without luck:

(MAYBE)Working Solution:

Forums where my problem is posted on: